Showing posts with label Blonde. Show all posts

Friday, April 8, 2022

A Picture is Worth a Thousand Words


 ...and a smile is worth a thousand more!


Formula:

Full Foil, Keune Creme Bleach w/ 20v

Shadow Root, Keune Semi 7.2 

Midshaft to ends, Keune Semi Silver


Price:

Full Foil, $160

Shadow Root, $10

Toner, $10

K18 ad-on, $10

Total: $190

Friday, March 25, 2022

Another Branding Photo Shoot!


 Color is on-point for another branding photo shoot tomorrow with the very talented photographer, Jean Kercheval. For this shoot we gave my wonderful model (Kate) a bright streak in the front (we call them her "Gloria Steinem" pieces) and toned the rest of her hair with three shades of blonde to enhance her existing hair color with a light, natural touch. I will share her formula with you all in a later post with the finished pictures.

I can't wait for Kate to meet the make-up artist tomorrow, it's probably the most fun and exciting part of the process! Here is a link to her Instagram: StudioFacade  Kate has agreed to be my muse and let me do whatever I like. Can't wait to show you her finished photos!

Tuesday, April 7, 2020

DIMENSONAL REDS AND BLONDES CERTIFICATE


This class was informative on both placement and color theory for delivering a big impact. I definitely think it helped me think about light reflection and placement of color in a new way.

Here is a vibrant red I did after this class and I am really happy with it. I would definitely call it a 'Dimensional Red!'


Friday, November 1, 2019

What Is "Dimension" in Blonde Hair?


Blonde hair using an all-over bleach and tone process is going to get you the lightest over-all blonde you can be. But typically, this kind of blonde is what I call "Flat Blonde." (There is an example at the bottom of this post.)

On the other hand, the blonde below has a simple (darker blonde) lowlight foiled in at about 2 inches apart. The hair is still very blonde but is has what is referred to as "dimension." The darker parts make the lighter parts pop.


The result is a very natural blonde that's flattering to almost everyone and doesn't leave you looking washed out and over processed.

In this particular case I do an all over base color of almost the lightest blonde (not bleach). Afterwards I went thru and added foils, about 2 inches apart, of the lowlight- adjusting the formula in the foils closest to the scalp to account for the base color and then a medium blonde on the midshaft and ends. If you are interested in this kind of look, just book a partial foil (full foil if you have lots of hair or think it may take extra time).

Here is an example of "Flat Blonde"


I am not saying one blonde is better than the other, but I know a lot of people are confused about the different words we use to describe different colors so I wanted to shed some light. Other terms used for (my term) 'Flat Blonde' are 'single process blonde,' 'bleach and tone,' 'platinum' and 'superblonde.'

I'm happy to do any of these as well but as I've said before, I'm a softie for gorgeous, healthy-looking hair and I tend to think the more natural look of a dimensional blonde achieves this the best.

Hope to see you soon!
Cheers!
-Lynn

Book online at my website: www.studiothreehairsalon.com

Wednesday, November 30, 2016

Go Blonde or Go Home...

What a great transformation to a natural "wheat blonde"
This was about a 6 hour (altogether - 2-3 appointment) transformation costing about $450 total from start to finish.

Why wait? It's a great time to make a big change and you don't have to bleach it out like Pamela Anderson. Natural looking blonde keeps hair healthy and looking gorgeous!


*Process included: All over color, 2 full foils and a gloss

Wednesday, September 23, 2015

Balayage from back in March 2015

I did this balayage on my long-time client back in March but forgot to post the pictures.


Here is the before photo. She had at least 6 months of growout between services:


I chose a very traditional balayage technique using deep, wide section in the under part for maximum color and thinner pieces toward the top to emulate regular highlights. I like this way of doing it because you walk out looking more like you just got your color done - not two months ago. But there are ways to mix and match for different effects obviously.


right around the face I used foils because I like to see as little marbilization around the face as possible.

The results were beautiful:

 Wet....

And dry...


Sunday, June 14, 2015

Babylights, Balayage and Cool Beige Blondness


After this hair party of hand painted high lift blondes leaving the roots natural for a "shadow blonde" effect we went for a bite at Chiangs and I snapped this because I was and am so in love with it. 

Full disclosure it took over three hours to achieve this level of ash (no yellow or warmth leftover) and we started with hair that had had at least one all over color with a high lift base and highlights that had some gold left in (peanut butter blonde I would call it. Oh - here is a before from when we were snap chatting the cut part lol


So.. The moral of the story is: this kind of blonde is a journey and it takes time and patience. 

I don't believe in pushing the hair beyond what it can do but I am willing to figure out just where those limits are and moseying right up to them. Oh! That reminds me - I've been meaning to write a post about olaplex .. Still going to do that.. But what I will say is I tried out the brazillian bond reconstructor ampules and it worked like a charm - but I wouldn't say it worked any better than the kitoka protein reconstructor I've been using for more than a year now. It's really amazing the advances we've made in the last ten years in the science of hair color. It's a really exciting time to be a colorist!

In any case, she left with silky, lovely white blonde and beige blonde highlights. She is armed with the products to help her keep the tone and integrity of her hair intact and I am thrilled with the stunning results - as is she!

Win!!!


Wednesday, April 29, 2015

Experience is a comb which nature gives us when we are bald. ~Proverb


I love styling hair for a special event.

My long-time client asked me if I wouldn't mind giving her a blowout on the day of a networking event for her company. Of course I went one step further and fashioned an up-do based on her dress... duh!


We were pressed for time and she was working on the presentation while I did her hair, but we got her out the door both hair and presentation looking great!

I wasn't able to take a whole lot of photos but I was able to snap a few.. here's the highlights:


In case anyone is interested in my "process" I had her txt me a picture of the dress and I sent back a few ideas for hairstyles which she ok'd ahead of time. Then, I sketched my intentions and the above photos are the result. Maybe she will be able to send me some pictures taken at the event and we can see how my sketch compared to the end result. It's always a rough idea... you can't get an updo nailed down until you actually working on the hair itself. I say it takes two tries -minimum- to find a way to engineer a formal hairstyle. And in a perfect world you'd get three... A first time trial for the basic idea. A second to try out your "engineering" (for me that's the plans in my sketchbook) .. and a third to re-work after you run across all the quirks of everyone's individual heads... density and texture of hair etc.


Of course, according to this very client, I am a bona-fide "hair nerd" ...and I think I could actually be quintessentially, THE bona-fide hair nerd, if that were possible. So.. I probably over think this stuff.

Ha!


Thursday, April 16, 2015

Foil-ayage ... It's kinda my "Thing"

My work. In the wild ;-)

This is a combination of foil and balayage which evolves over time. If you'd like to get to this level of low-maintenance/high impact blonde start with a full or partial foil and we will alternate every other or every third time with different balayage techniques. This has traditional "color sweep" or "hand painted highlight" balayage as well as a variation on the 'dipped' perimeter that ends up with a softer line. Because of the dark crown and root area the effect is a sophisticated beachy ombre. 

Love your hair!
xoxo

Monday, April 7, 2014

Strawberry Dream Hair


Grown out all-over color (grown out about 4 months, so a little tricky) transformed last Thursday night with highlights, lowlights and a hint of gold for a touch of strawberry blonde for this natural red-head gone a little grey. 

Because of her schedule I went with a foil vs. touching up the all over color because the grow out between visits will be much softer for her than a harsh line that's difficult as far as upkeep. So part of it was a lifestyle decision factoring in but I couldn't have been more happy with the result!

Peace and Love all...

Tuesday, October 9, 2012

transformation, a journey from light to dark

Before and After:


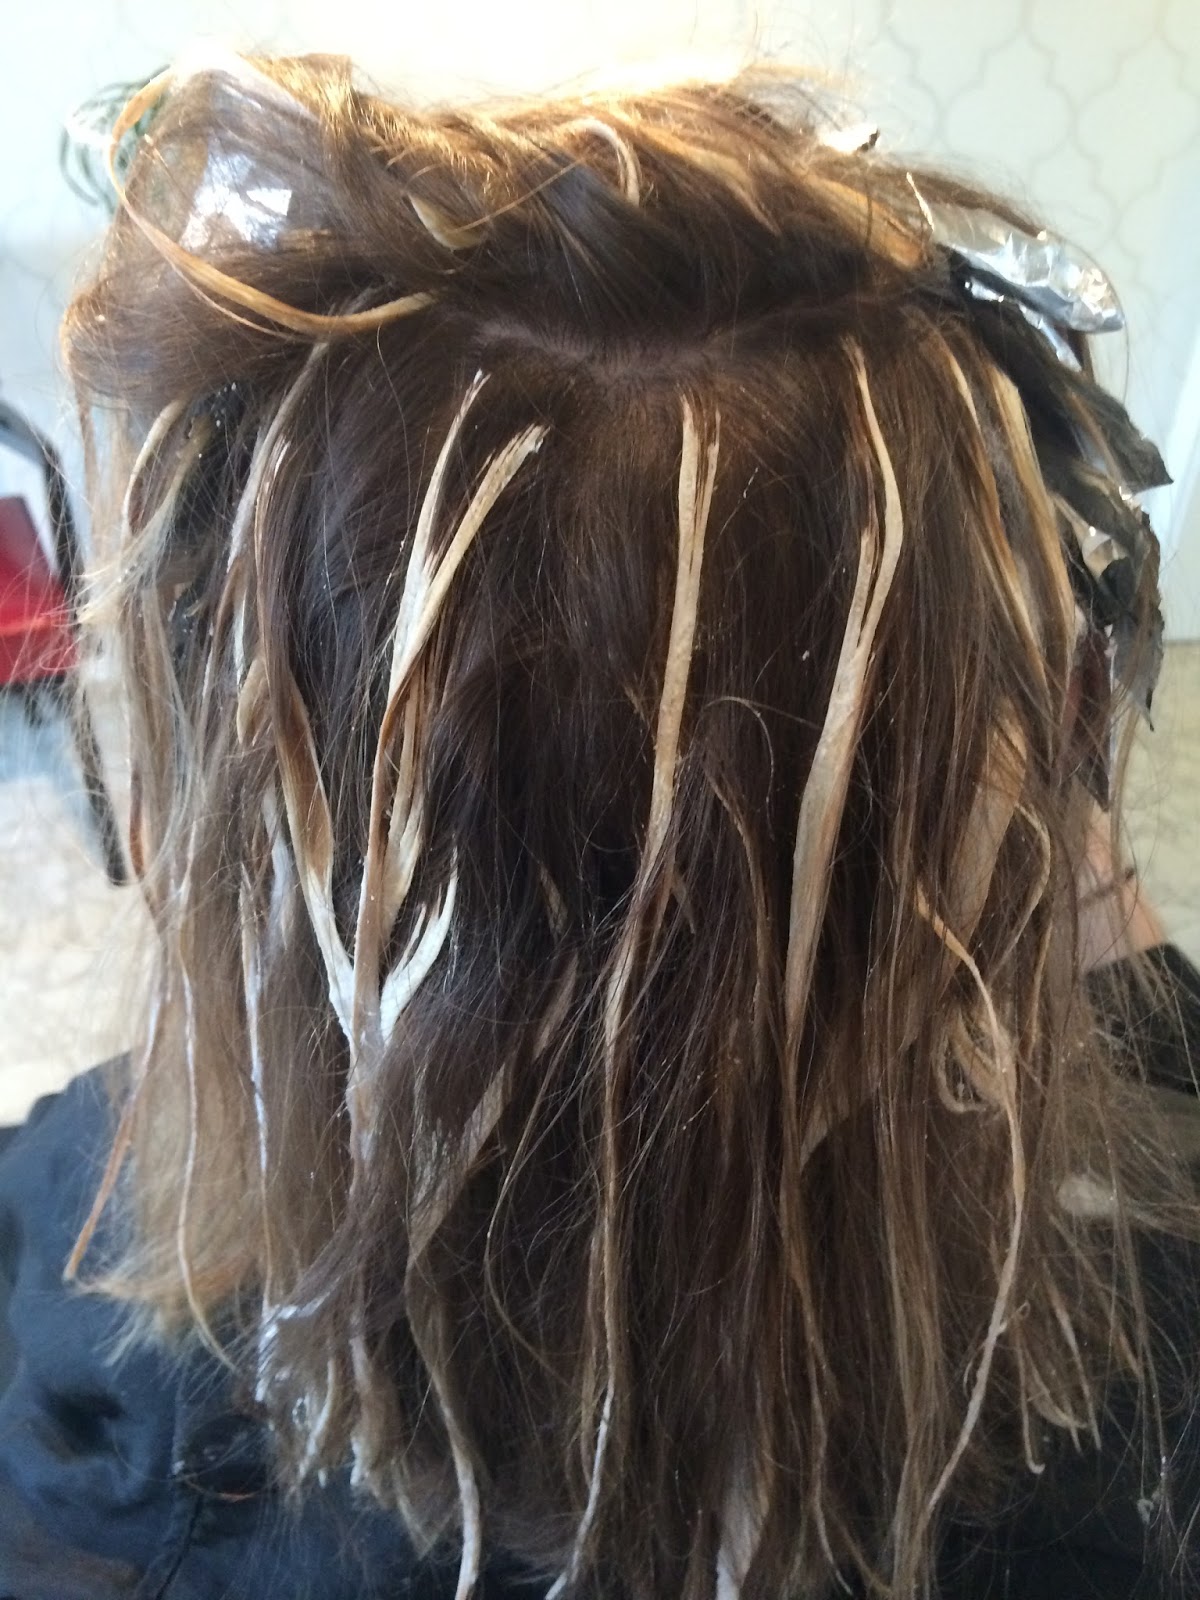
This is an interesting case. It's not every day you get the opportunity to color someone from platinum to dark brown. Stylists know this is a hard process, almost as hard as doing the opposite (almost). The trouble is it's easy to turn the hair into 'shoe polish' as they called it in beauty school way back when.
I was able to take her from very bleached out to a dimensional sparkly brown and in the middle of it, we got to see what she looked like with a color close to her natural. She's the kind of person who likes to be on the extreme ends of the color spectrum and that really does fit her personality better but it was fun to see the very natural color in the meantime and it was a wonderful way to fill the hair and avoid the shoe polish trap. We ended up with a beautiful sparkly brown and I go the satisfaction of knowing I was able to do one of the hardest things to do in hairdressing.. I'm feeling pretty good about that!!

The Process: 

(I didn't warn her I was doing pictures and she graciously agreed to let me take photos even though she didn't wear any makeup, thank you thank you thank you!) Note, from the "before picture" above I had done two foils of lowlights because we were on the slow track to getting her back to a more manageable blonde with less upkeep, but she called me up out of the blue and was just ready to go for it and no-holds-barred go dark.

The first thing I did was foil in some conditioner foils to keep some of the very light hair. My thinking was that even when we got to the dark brown, she would get some dimension from this step. To be honest, I have to puff my chest out a bit on it because it worked like a charm.

Then I painted in between the foils with a color I was guessing to be close to her natural color. Number one I thought this could act as a filler and number two it's been so long since she had been a color close to natural we ought to do it just because after we made it dark we wouldn't be able to again.

Here's the middle color (close to her natural color - but her personality is much more drawn to hair colors that are on either the lighter or darker extreme from her natural. In general, I try and keep people no more than three shades lighter or darker than their natural, except in a case like this where I know the person is really committed to it. Also, because we are going to keep it dark for a good long while with glosses I know we can grow her hair out to a length she likes and keep it healthy). Anyway, here is the 'middle step' of the process:


This is probably where I would have stopped that day and let her live with it for a month and then come back and put the dark color over that. But she was 100% ready to be dark brown so I put a second gloss over this one of a level 4 and level 5 mix in the Keune Semi (a gloss that leaves the hair shiny and in excellent condition.

I was so pleased with the rich, sparkly brunette we achieved in one day from platinum, check it out! (of course it was the worst possible light for a picture, but in the close up you can see the sparkle in the hair.. and for people that don't know how difficult it is to get hair that has been stripped of all its pigment to look a natural healthy brown.. this is one of the hardest things a hairdresser can do! Sure, going platinum is scary and not breaking the hair is real concern, I'm not trying to minimize or anything.. But something like this takes real skill, artistry and truly tests your professional abilities. Stuff like this keeps me sharp!


This was a fun process and really made me excited to watch the rest of the transformation as we grow her hair out to long and healthy! Good stuff!!

Friday, January 14, 2011

Back to Natural

This model was basically an all-over blonde from heavy foil highlights and she was tired of the maintenance, tired of the grow-out and tired of the time it took for upkeep. She wanted to go back to her natural color with just a little blonde left in for highlights.

I foiled out some of her highlights (using blonde on the new growth and conditioner on the ends) and painted  her natural color between the foils. It's probable that the dark color will fade somewhat the first time because the blonde we were going over is very porous and there's not a lot inside the hair shaft for the color to hold onto. It could mean we will need to repeat this process a few time before we get the desired level of coverage. I'll be seeing her in a few weeks for a haircut so we will assess next steps at that time. It was a really fun transformation and I hope she enjoys having more fun as a brunette!

Before and After:


During the Process (conditioner foils and then the painting between foils):


Close-up of the newly darkened hair with conditioner highlights: